Showing posts with label SharePoint Online. Show all posts

Friday, February 9, 2018

Sri Lanka SharePoint Forum - Feb 2018

I'm happy to invite you all for the "SharePoint Sri Lanka" User Group monthly gathering happening on Wednesday the 14th of February.

As usual there will be two technical sessions; "Office 365 CLI: Managing Office 365 tenant and SharePoint Online" hosted by our new MVP, Suhail Jamaldeen and "Site Design and Site Script" hosted by me.


happy days!! :)

Wednesday, January 10, 2018

SharePoint Online Site Design

If you were thinking of creating templates in Office 365 for SharePoint online, it has staring to become available in Office 365 which is still in preview.
Is this SharePoint PnP Site Provisioning?
No. This is an alternate way of creating templates and creating new instances of sites.

What is site design?
It provides you with reusable lists, pages, layouts, themes and custom actions. In another way it’s a predefined template to create new instances of their sites. The template is collection of actions specified in a JSON script. In execution of the script, each item is actioned.
Once the JSON Script is designed, it must be registered in SharePoint. Then the template is will be available to the users to create new instances.

Prerequisites
Make sure you have installed SharePoint Online Management Shell and you know how to connect to SharePoint Online using PowerShell.

JSON schema
As I mentioned earlier, site design is a set of actions where each action is specified by a verb value. Some actions do have sub actions based on the complexity. Refer to the JSON schema reference. Shown below is the base structure of the JSON script.

 {  
   "$schema": "schema.json",  
     "actions": [  
       ...  
       <your actions goes here>  
       ...  
     ],  
     "bindata": { },  
     "version": 1  
 };  

I will create one List called "Customer Tracking List". List template reference and Field type reference will be helpful to select the base types. You can see the main action "createSPList" and the sub actions "SetDescription" and "addSPField".

 $site_script = @'  
 {  
  "$schema": "schema.json",  
    "actions": [  
      {  
        "verb": "createSPList",  
        "listName": "Customer Tracking",  
        "templateType": 100,  
        "subactions": [  
          {  
            "verb": "SetDescription",  
            "description": "List of Customers and Orders"  
          },  
          {  
            "verb": "addSPField",  
            "fieldType": "Text",  
            "displayName": "Customer Name",  
            "isRequired": false,  
            "addToDefaultView": true  
          },  
          {  
            "verb": "addSPField",  
            "fieldType": "Number",  
            "displayName": "Requisition Total",  
            "addToDefaultView": true,  
            "isRequired": true  
          },  
          {  
            "verb": "addSPField",  
            "fieldType": "User",  
            "displayName": "Contact",  
            "addToDefaultView": true,  
            "isRequired": true  
          },  
          {  
            "verb": "addSPField",  
            "fieldType": "Note",  
            "displayName": "Meeting Notes",  
            "isRequired": false  
          }  
        ]  
      }  
    ],  
      "bindata": { },  
  "version": 1  
 }  
 '@  

Currently site design has a few more actions; add and remove fields and content types, set custom field formatting using JSON, add navigation links, apply a theme a site logo, joining a Hub Site and triggering a Flow. Still Site design is in preview, lets hope there will be more actions added in the future.

PowerShell
Once the JSON script is ready, we need to add the script and create a new site design which is a two step process.

Add Script
 C:\> Add-SPOSiteScript -Title "Create Project Site" -Content $site_script -Description "Creates lists for managing projects"  


Create Site design
 Add-SPOSiteDesign -Title "Contoso Project Management" -WebTemplate "64" -SiteScripts "4a2ef0f9-a1dd-48a1-8703-e73300418eb6" -Description "Peoject management template"  
You need to provide the ID returned from the Add-SPOSiteScript to the Add-SPOSiteDesign cmdlet.

Log in to your SharePoint Online tenant and go to the home page of your SharePoint site. Click "Create Site" and you will be able to see the newly added template.

Once the site is created, it will execute the script call the actions to proceed with the customization.
refer to the link for more info and updates.

Thursday, November 30, 2017

Column formatting in SharePoint Online

Recently Microsoft introduced a new way of Column formatting in SharePoint Lists and Libraries. Simply you create a JSON object that describes how the elements should be rendered with the styles when a field is included in a list view. The users with create and manage views permission in a list can change how the fields will be displayed. Formatting columns will not have any effect on the underlying data.

I have created a simple List, shown below. Let's start how column formatting will work on it.

So, how exactly the JSON file is structured? Well, best place to start is, SharePoint/sp-dev-column-formatting repository by customizing the existing sample.

 You can simply paste your JSON code into the text box in the Format column section.

 {  
  "$schema": "http://columnformatting.sharepointpnp.com/columnFormattingSchema.json",  
  "debugMode": true,  
  "elmType": "div",  
  "txtContent": "@currentField",  
  "attributes": {  
   "class": "sp-field-dataBars"  
  },  
  "style": {  
   "width": {  
    "operator": "?",  
    "operands": [  
     {  
      "operator": ">",  
      "operands": [  
       "@currentField",  
       "20"  
      ]  
     },  
     "100%",  
     {  
      "operator": "+",  
      "operands": [  
       {  
        "operator": "toString()",  
        "operands": [  
         {  
          "operator": "*",  
          "operands": [  
           "@currentField",  
           5  
          ]  
         }  
        ]  
       },  
       "%"  
      ]  
     }  
    ]  
   }  
  }  
 }  

I've used the above JSON block to format the "Effort" column in my Project estimate list. Also I have applied custom formatting to "Assign to" column to display the users profile pic and "Status" column to show the status of each task.


Would love to see someone releasing a tool to simply generate the JSON. :)

Saturday, May 20, 2017

OneDrive with files On-demand

This is the #1 features OneDrive users were waiting for. I was so thrilled to see Jeff Tepers announcement on the release of OneDrive on-demand feature.

Day by day people create and collaborate with more and more files, including photos, work related and personal files. As the number grows the same with the capacity as well. But how often do you need all these files at the reach of your finger tips, I mean in your local machine.

The On-demand feature in One-Drive will cater this requirement beautifully by allowing you to access all your files in the cloud without having to download them and use storage space on your device.
You can see a new file status column representing each file, which will show you the existence of the file. Whether the file is in the cloud or in your local machine. You have the option of always keeping the file in your device.

As you can see in the above images, it will show you all the files as they are in your local machine, but it will not consume any storage unless you download the files locally. Online files will automatically download and become locally available when you need them. Simply double-click a file in File Explorer or open it from within an app.

If you are a Windows 10 user, update to Fall Creators Update to enjoy the cool feature.

Saturday, March 11, 2017

Automate Office 365 PowerShell in Azure

One of my clients who's using Office 365 had a requirement to execute a PowerShell script on a predefined schedule. This can be achieved in many different ways. You can even automate a script using Windows scheduler. But what I'm going to talk about is a, how to automate a script using Azure Automation. As a prerequisite You must have a Azure.

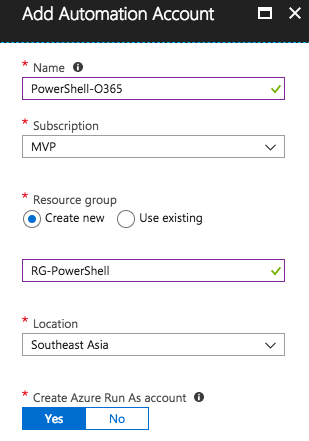
Log in to your Azure tenant and create a Azure Automation Account.


Create an account.

Next step is to select the necessary PowerShell Module. My PowerShell script was based on SharePointPnPPowerShellOnline. You can simply go to the Modules section, search for the relevant module.

and import.

As you are executing the script remotely, you have to store a users credentials. Hopefully not as plain text in the script. :) Select the Credentials and add the username and the password.


Next is to add your script by selecting Runbooks and adding one.

Place your script in the editor. Also make sure to add your stored credentials as shown in the below screen. You can create a variable from the credentials and pass it to your command.

 $credentials = Get-AutomationPSCredential -Name 'Quicksilver'  

Save & Publish. Next go to the Schedule and create a new schedule for your Runbook.
Happy days!! :)

Tuesday, January 17, 2017

File upload failed to SharePoint Online Style Library

I was changing the look and feel of a SharePoint online Team Site. So I needed to upload a few CSS, JS and ASPX files. I tried through the browser and got the below error. “The documents cannot be uploaded because different permissions are needed. Request the necessary permissions.” At the same time I was trying through SPD as well. But the same result with a different error message “Access Denied”. These errors have nothing to do with the Site Collection / Site level permissions.

2

Well, Googling, I figured that enabling custom scripts in admin center will do the job. In your Office 365 admin center, go to SharePoint Admin Center and select Settings. There you will see the “Custom Script”, where you can enable it for personal sites and self-service created sites. But the catch is, it’s gonna take 24 hours to take effect.

1

The Custom Script feature enables or disables scripting capabilities on SharePoint Online personal sites and self-service sites. Because self-service site creation points to your tenant’s root site collection by default – you’re actually applying the scripting capability to your tenant’s root site collection. If you don’t want this and instead want to enable or disable scripting on another site collection, you can point the self-service site creation root to another valid site collection in Office 365.

To enable scripting on a particular site collection immediately, use the following PowerShell command
Set-SPOsite <SiteURL> -DenyAddAndCustomizePages 0

There’s a lot more info about it in the below url.
https://support.office.com/en-us/article/Turn-scripting-capabilities-on-or-off-1F2C515F-5D7E-448A-9FD7-835DA935584F?ui=en-US&rs=en-US&ad=US&fromAR=1