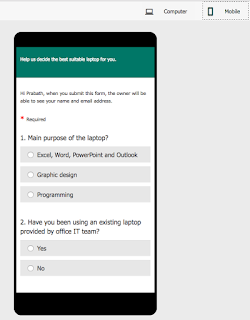
"With Microsoft Forms, you can create surveys, quizzes, and polls, and easily see results as they come in. When you create a quiz or form, you can invite others to respond to it using any web browser, even on mobile devices. As results are submitted, you can use built-in analytics to evaluate responses. Form data, such as quiz results, can be easily exported to Excel for additional analysis or grading."
Monday, June 19, 2017
Experience the Microsoft Forms Preview
"With Microsoft Forms, you can create surveys, quizzes, and polls, and easily see results as they come in. When you create a quiz or form, you can invite others to respond to it using any web browser, even on mobile devices. As results are submitted, you can use built-in analytics to evaluate responses. Form data, such as quiz results, can be easily exported to Excel for additional analysis or grading."
Saturday, May 20, 2017
OneDrive with files On-demand
Day by day people create and collaborate with more and more files, including photos, work related and personal files. As the number grows the same with the capacity as well. But how often do you need all these files at the reach of your finger tips, I mean in your local machine.
The On-demand feature in One-Drive will cater this requirement beautifully by allowing you to access all your files in the cloud without having to download them and use storage space on your device.
You can see a new file status column representing each file, which will show you the existence of the file. Whether the file is in the cloud or in your local machine. You have the option of always keeping the file in your device.
As you can see in the above images, it will show you all the files as they are in your local machine, but it will not consume any storage unless you download the files locally. Online files will automatically download and become locally available when you need them. Simply double-click a file in File Explorer or open it from within an app.
If you are a Windows 10 user, update to Fall Creators Update to enjoy the cool feature.
SharePoint Saturday - Colombo 2017
Speakers and the team who was behind the seen to make it great success.
Speakers...
and that's me hosting the session; "The Serverless Nirvana"
All attendees...
and how can we forget the selfie...
thanks again for everybody who made it a great success. Till #SPSaturday #SPSColombo
Friday, April 7, 2017
Mount an Azure File Share using PowerShell
The good thing with Azure file Share is, its not limited to Cloud when sharing or accessing. Once the storage account is created which includes a file share, it can be accessed from machines/VMs in cloud as well as machines in on-premises.
I named my file share as fscommon. Well, as a practice I used to as a prefix for all the resources I create.
Prior mounting the file share, you need to make sure you copy your storage account key.
You can select one of the keys given by azure. You can replace the existing keys by regenerating new keys. Below PowerShell script can be used to attached your Azure File Share to your machine. Make sure to replace the storage account key, storage account name, Drive letter and the share name with your own values.
$acctKey = ConvertTo-SecureString -String "<storage-account-key>" -AsPlainText -Force
$credential = New-Object System.Management.Automation.PSCredential -ArgumentList "Azure\<storage-account-name>", $acctKey
New-PSDrive -Name <desired-drive-letter> -PSProvider FileSystem -Root "\\<storage-account-name>.file.core.windows.net\<share-name>" -Credential $credential
But shared drive will be mounted till you restart your machine. If you need to mount the drive permanently (till you unmount), use the -persist parameter with the New-SPDrive cmdlet.
Happy days :)
Saturday, March 11, 2017
Automate Office 365 PowerShell in Azure
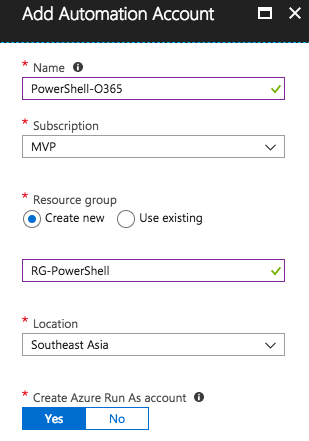
Log in to your Azure tenant and create a Azure Automation Account.
Create an account.
Next step is to select the necessary PowerShell Module. My PowerShell script was based on SharePointPnPPowerShellOnline. You can simply go to the Modules section, search for the relevant module.
and import.
As you are executing the script remotely, you have to store a users credentials. Hopefully not as plain text in the script. :) Select the Credentials and add the username and the password.
Next is to add your script by selecting Runbooks and adding one.
Place your script in the editor. Also make sure to add your stored credentials as shown in the below screen. You can create a variable from the credentials and pass it to your command.
$credentials = Get-AutomationPSCredential -Name 'Quicksilver'
Save & Publish. Next go to the Schedule and create a new schedule for your Runbook.
Happy days!! :)
Saturday, February 11, 2017
Add a new user to an existing Azure Subscription
Let me explain my scenario. I'm using a single Microsoft account to log in to Azure Portal where I manage multiple Azure Subscriptions. I wanted to add a user or grant permissions to another users to one of Azure Subscriptions where he can manage resources.
So, the first thing did was, select the subscription and select Access control (IAM). In the image you can see I've already given permission to 2 users the necessary permission.
Click on Add where you will see a blade with the all available roles, scope of where the users permission will be set to and where you can select/search your user.
If your use is already added to your AD, the name will be displayed in the dropdown. If not you can still search for the user and provide the access rights. In my scenario, its just the Contributer access I wanted to provide.
With ♡ from Cloud.
Tuesday, January 17, 2017
File upload failed to SharePoint Online Style Library
I was changing the look and feel of a SharePoint online Team Site. So I needed to upload a few CSS, JS and ASPX files. I tried through the browser and got the below error. “The documents cannot be uploaded because different permissions are needed. Request the necessary permissions.” At the same time I was trying through SPD as well. But the same result with a different error message “Access Denied”. These errors have nothing to do with the Site Collection / Site level permissions.
Well, Googling, I figured that enabling custom scripts in admin center will do the job. In your Office 365 admin center, go to SharePoint Admin Center and select Settings. There you will see the “Custom Script”, where you can enable it for personal sites and self-service created sites. But the catch is, it’s gonna take 24 hours to take effect.
The Custom Script feature enables or disables scripting capabilities on SharePoint Online personal sites and self-service sites. Because self-service site creation points to your tenant’s root site collection by default – you’re actually applying the scripting capability to your tenant’s root site collection. If you don’t want this and instead want to enable or disable scripting on another site collection, you can point the self-service site creation root to another valid site collection in Office 365.
To enable scripting on a particular site collection immediately, use the following PowerShell command
Set-SPOsite <SiteURL> -DenyAddAndCustomizePages 0
There’s a lot more info about it in the below url.
https://support.office.com/en-us/article/Turn-scripting-capabilities-on-or-off-1F2C515F-5D7E-448A-9FD7-835DA935584F?ui=en-US&rs=en-US&ad=US&fromAR=1